Categories
CDMA Ruby

使用Ruby在windows下通过串口自动测试AT

原文http://deli.xmu.me/?p=7,放在Wayhome mm给我提供的空间,现在已经无法访问。

手机芯片厂家常常会更新模组软件版本,在发给客户之前,一般先对AT进行一次测试。手机设计公司收到新的软件版本,烧入Flash, 也要对模组的AT进行一次测试,验证是否正常,比较与上个版本是否有差别。手工一个个验证,乏味,容易对工作失去兴趣。

从http://rubyinstaller.rubyforge.org 可以下载 Ruby One-Click,现在最新版本安装软件为ruby186-27_rc2.exe。安装过程中,把RubyGems也勾上。在windows上用ruby访问串口,可以用win32ole模块,也可以用ruby-serialport,后者是跨平台的。安装ruby-serialport前要做一些准备工作,确认有装Microsoft’s Visual C++ 或Borland’s C++编译器,这里以VC6.0为例。
(1)设置环境变量:

PATH=C:\Program Files\Microsoft Visual Studio\VC98\Bin
INCLUDE=C:\Program Files\Microsoft Visual Studio\VC98\Include
LIB=C:\Program Files\Microsoft Visual Studio\VC98\Lib

(2)安装ruby-serialport:
开始 -> 程序 -> Ruby-186-27 -> RubyGems -> RubyGems Package Manager,输入:
gem install ruby-serialport
如果提示找不到mspdb60.dll, 请到http://www.dll-files.com 找,把它放到
C:\Program Files\Microsoft Visual Studio\VC98\Bin
接下来,就可以写一个测试脚本了。

# filename: test.rb
require 'rubygems'
require 'serialport'

# 0 is mapped to "COM1" on Windows, and 5 is COM6, 115200 is baud rate
sp = SerialPort.new(5, 115200)
sp.write "AT\r\n"
sleep(0.2)
puts sp.read   # hopefully "OK" ;-) 

注意:如果没有sleep,可能会收不到”OK”响应。

如果你弄了老半天,ruby-serialport也没装得上,那就用用win32ole,美其名曰:Windows Automation。win32ole是Masaki Suketa编写的Ruby扩展,是标准ruby发行版本的一部分。
现在写一个mscomm.rb文件

#! /usr/bin/env ruby
#
# filename: mscomm.rb
# @date 2009.5.16
#

require 'win32ole'

class MSCOMM
  def initialize(port)
    @serial = WIN32OLE.new("MSCOMMLib.MSComm")

    @serial.CommPort = port
    @serial.Settings = "115200,N,8,1"
    @serial.InputLen = 0
    @serial.PortOpen = true
  end
  def write(str)
    @serial.Output = str
  end
  def read
    str = @serial.Input
    str
  end
  def close
    @serial.PortOpen = false
  end
  def serial
    @serial
  end
end

再写一个简单的测试用例test_comm.rb:

#! /usr/bin/env ruby
#
# filename: test_comm.rb
# @date 2009.5.16
#

require 'mscomm.rb

comm  = MSCOMM.new(6)
comm.write("AT\r\n")
sleep(0.2)
puts comm.read
comm.close

和上面的test.rb用法一样,没什么神秘感,是不是很简单呢 🙂

再加个查询信号的AT,在test_comm.rb倒数第二行加上
comm.write(“AT+CSQ?\r\n”)
sleep(0.2)
puts comm.read
要是很多很多…想想,还是写个函数吧.

def exec_cmd(comm, cmd)
  comm.write("#{cmd}\r\n")
  sleep(0.2)

  begin
    result = comm.read
    result = "Command not support\n" if result.include?("ERROR\n")
  rescue
    result = "Writing serial port error\n"
  end

  puts result
end

于是,test_comm.rb中间部分的可以可以写成:
exec_cmd(comm, “AT”)
exec_cmd(comm, “AT+CSQ?”)

可是每添加一个AT… 还是得写一串的exec_cmd(comm… 。Dave Thomas大师说过:”Don’t Repeat Yourself!” ,这是ruby的设计理念。假设所有的AT都放在另外一个文件呢?我们也可以一个个读取出来。不过现在考虑的是暂时放在同个文件,那就定义一个字符串数组:
atcmd = {
‘AT’,
‘AT+CSQ?’,
‘AT+CREG?’
}
也可以这样写:
Atcmd = %w{
AT
AT+CSQ?
AT+CREG?
}

第二种对于添加AT比较方便,但缺点是AT不能出现空格。那么test_comm.rb 现在又可以写为:
atcmd.each {|at| exec_cmd(comm, at) }

可是,有的AT需要花一些时间才有响应。之前都默认是0.2秒,好吧,重新定义:
def exec_cmd(comm, cmd, timeout = 0.2)

sleep(timeout)

end

于是,就可以这样使用
exec_cmd(comm, “AT+CDV=10000”, 3)
exec_cmd(comm, “AT+CLCC?”)
exec_cmd(comm, “AT+CHV”)
exec_cmd(comm, “AT+CPOF”, 2)
exec_cmd(comm, “AT+CPON”, 5)

像这样的一组AT,具有依赖顺序而每个AT的响应时间又不一样,我们只能根据不同的情况对AT做分类,写不同的测试脚本。

再回头看看 test_commm.rb,如果我们想把输入与输出都放在同一个Excel表格,那该如何写呢?原理一样,依旧用win32ole:

#! /usr/bin/env ruby
#
# filename: excel.rb
# @date 2009.5.16
#

require 'win32ole'

class Excel
  def initialize(filename = nil)
@excel = WIN32OLE.new("excel.Application") # create Excel object

    @excel.Visible = TRUE
    if (filename == nil)
      @workbook = @excel.Workbooks.Add() # create new file
    else
      @workbook = @excel.Workbooks.Open(filename) # open exist file
    end
  end

  def setvalue(pos, data)
    @excel.Range(pos).Value = data
  end
  def save
    @excel.Save()
  end
  def close
    @excel.Quit()
  end
  def excelobj
    @excel
  end

end # end of class

我们重新写个test_cdma_at.rb

#! /usr/bin/env ruby
#
# test_cdma_at.rb
# @date 2009.5.16
#

require 'mscomm.rb'
require 'excel.rb'

def exec_cmd(comm, cmd)
  comm.write("#{cmd}\r\n")
  sleep(0.2)

  begin
    result = comm.read
    result = "Command not support\n" if result.include?("ERROR\n")
  rescue
    result = "Writing serial port error\n"
  end

  return result
end

atcmd = %w{
AT
AT+CPIN?
AT+CPINC?
AT+CSQ?
AT+CREG=2
AT+CREG?
AT+VMCC?;+VMNC?
AT+CPBS=?
AT+CPBS?
AT+CPBS="ME"
AT+CPBS?
AT+CPBW=3,13544049382,"violet",0
AT+CPBR=3
AT+CMGS=13544049382,"Hello!"
AT+CMGW=,13544049382,"Hi!"
}

comm  = MSCOMM.new(6)
excel = Excel.new("d:\\Book1.xls")

i = 1

atcmd.each {|at|
  excel.setvalue("a#{i}", at)
  excel.excelobj.Range("b#{i}").Value = exec_cmd(comm, at)
  i += 1
}

comm.close
excel.save
excel.close

代码不难理解,就是把AT输入放在Excel表格某行的A列,响应写入某行的B列,仅如此而已。

脚本测试也不是万能的,AT本身具有随意性,写脚本意在减轻编码工作量,避免重复机械的劳动。

Categories
Android

How to Use Android Downloads Provider

“Good programmers write solid code, while great programmers reuse the code of good programmers”
— W. Jason Gilmore, the author of “Beginning PHP and MySQL”

In Android Platform, it supports some ways to download files from URLs via HttpURLConnection or HttpClient, or DownloadProvider.When you write an android programm with Eclipse, try to import:

import android.provider.Downloads

The Eclipse gives a red error prompting and complains:

The import android.provider.Downloads cannot be resolved

Oops…

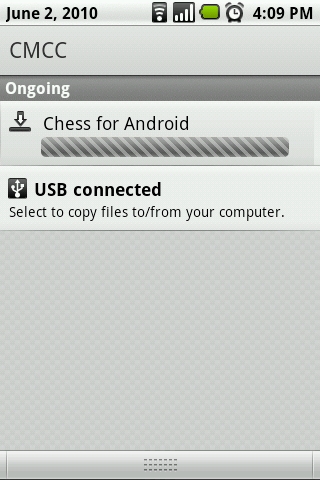
The download manager is not part of the public SDK, and there are no relational API description in Android developers Reference.Comment in sources frameworks/base/core/java/android/provider/Downloads.java, says: “For 1.0 the download manager can’t deal with abuse from untrusted apps, so this API is hidden.” Refer to the document description from: packages/providers/DownloadProvider/docs/index.html. we Know that Browser / Gmail / Market / Updater depend on the download manager. Yes, show some screenshots in the market:

use downloadprovider in android market

android market downloads shows in the statebar.

We maybe can’t compile with Eclipse, but we can write an Android.mk makefile, use mmm to do it.

DownloadProvider is very easy to use.First, declare permission in AndroidManifest.xml:

<uses-permission
    android:name="android.permission.INTERNET"
    >
</uses-permission>
<uses-permission
    android:name="android.permission.ACCESS_DOWNLOAD_MANAGER"
    >
</uses-permission>

And then just need to fill some field values:

ContentValues values = new ContentValues();
String url = "https://blog.lytsing.org/wp-content/uploads/2010/06/android_downloadprovider_market.jpg";
values.put(Downloads.URI, url);
values.put(Downloads.MIMETYPE, "image/jpeg");
values.put(Downloads.FILENAME_HINT, getFullFilename("android_downloadprovider_market.jpg"));
values.put(Downloads.TITLE, "screenshot");
values.put(Downloads.DESCRIPTION, "screenshot file for DownloadProvider Demo");
values.put(Downloads.VISIBILITY, Downloads.VISIBILITY_VISIBLE);
values.put(Downloads.NOTIFICATION_CLASS, "org.lytsting.android.downloads.DownloadReceiver");
values.put(Downloads.NOTIFICATION_PACKAGE, "org.lytsting.android.downloads");
getContentResolver().insert(Downloads.CONTENT_URI, values);

private String getFullFilename(String filename) {
    return Environment.getExternalStorageDirectory().toString() + "/download/" + filename);
}

Notes

Downloads.FILENAME_HINT, for a demo, here, I put the file into SD Card, the download directory, without checking any exception.
Downloads.NOTIFICATION_CLASS, you want to write a DownloadReceiver class, which extends BroadcastReceiver, and handle the message Downloads.DOWNLOAD_COMPLETED_ACTION or Downloads.NOTIFICATION_CLICKED_ACTION. like this:

public class DownloadReceiver extends BroadcastReceiver {
    static final String TAG = "DownloadReceiver";

    @Override
    public void onReceive(Context context, Intent intent) {
        Log.d(TAG, intent.getAction());
        if (intent.getAction().equals(Downloads.NOTIFICATION_CLICKED_ACTION)) {
            Intent activityIntent = new Intent(Intent.ACTION_VIEW);
            activityIntent.setFlags(Intent.FLAG_ACTIVITY_NEW_TASK);
            activityIntent.setClass(context, Downloads.class); // Downloads Activity
            try {
                context.startActivity(activityIntent);
            } catch (ActivityNotFoundException ex) {
                Log.d(TAG, "no activity for Downloads.NOTIFICATION_CLICKED_ACTION" + ex);
            }
        } else if (intent.getAction().equals(Downloads.DOWNLOAD_COMPLETED_ACTION)) {
            // balabala
        }
    }
}

By here, we need to modify the AndroidManifest.xml, add:

<receiver
    android:name=".DownloadReceiver"
    android:permission="android.permission.SEND_DOWNLOAD_COMPLETED_INTENTS"
    android:exported="true" >
    
    <intent-filter>
        <action
            android:name="android.intent.action.DOWNLOAD_COMPLETED">
        </action>
    </intent-filter>
    <intent-filter>
        <action
            android:name="android.intent.action.DOWNLOAD_NOTIFICATION_CLICKED">
        </action>

        <category
            android:name="android.intent.category.DEFAULT">
        </category>
        <data
            android:scheme="content">
        </data>
    </intent-filter>
</receiver> 

Maybe, you don’t like show the the Download state in status bar, just change Downloads.VISIBILITY_VISIBLE to Downloads.VISIBILITY_HIDDEN

and even, maybe you would like to show the download progress in the Activity, little case.

Cursor c = getContentResolver().query(
        Downloads.CONTENT_URI, new String[] {
        Downloads._ID,
        Downloads.CURRENT_BYTES,
        Downloads.TOTAL_BYTES,
        Downloads.STATUS }, 
        " " + Downloads.MIMETYPE + " = 'image/jpeg'", null,
        Downloads._ID);

if (c == null) {
    return;
}

// Columns match projection in query above
final int idColumn = 0;
final int currentBytesColumn = 1;
final int totalBytesColumn = 2;
final int statusColumn = 3;

c.moveToFirst();
long totalBytes = c.getLong(totalBytesColumn);
long currentBytes = c.getLong(currentBytesColumn);

c.close();

Add a ProgressBar and a Handler to display and refresh the progress, I suppose you should know how to do. You also can write a class extends ContentObserver to observer the download status.

The last step, delete the history data:

getContentResolver().delete(Downloads.CONTENT_URI,
                 "(" + Downloads.TITLE + " = 'screenshot')", null);

This code snippet should be write into a function in really code.

Read the code packages/apps/Browser for a more complete example.

Update:Since Android 2.2, the Downloads’s api has changed, they put some variables input a sub class which named Impl, so you should check it in the source code.

Categories
Android

如何学习Android应用程序的开发

昨天一同学问我,如何快速的学习Android应用程序开发? 之前的一位同事也问过我,我也只是大概的说说看哪些资料。为避免更多的人问我,所以有必要写写。

1. 开发环境搭建。自行Google。英文好的,看官方网 http://developer.android.com/ 访问不了的,可以访问它的镜像 http://androidappdocs.appspot.com/index.html

2. 在模拟器上运行 ApiDemos,全部点一遍,看看Android都提供了些什么界面效果,心里有个印象。最好把ApiDemos的代码,看它个两三遍。我到过深圳南山书城,看了好几本国内出的Android书籍,一本书都没翻多久,就看完了,没啥看头,因为大部分内容ApiDemos都有了呀。

3. Java的学习。
Android应用程序是用Java写的,像我这样从C/C++阵营过来的,开始真的很抵触。《Thinking in Java》 ??? No! 没时间玩这东西,当做参考书还行,不懂就翻翻。宝岛台湾的林信良老师写的《Java学习笔记》,还不错。
http://caterpillar.onlyfun.net/Gossip/JavaGossip-V1/JavaGossip.htm
http://caterpillar.onlyfun.net/Gossip/JavaGossip-V2/JavaGossip2.htm
大约花一个礼拜的晚上时间学习,基本够用。

4. 学习资料
(1) 网站
官网 developer.android.com,英文差的同学,也要硬着头皮看,在网上搜来搜去,其实大部分东西都是从这拷贝过去的,从而浪费了大把的时间。国内的android论坛,好像就javaeye文章质量高一点,其他的不知道。我一直上国外的 http://www.anddev.org/ 它有两个版面 Novice Tutorials和Code Snippets for Android,有教程,可以下载代码编译运行,初学者最喜欢这样的了。不像一些网站,下载代码还要扣积分等其他7788的,一看就没什么好感。

(2) 书籍
就只推荐三本,其他的没看过,不好评论。
Mark L. Murphy: 《The Busy Coder’s Guide to Android Development》
Chris Haseman:《Android Essentials》
高煥堂:《Android 應用框架原理與程式設計36 技》

初学者最好不要第一本书就看高的书,因为一些东西他讲起来莫名其妙,搞复杂了,一看developer.android.com英文原版的资料,噢!英文描述这么简单啊。

(3) Blogs
请参看 http://wiki.andmob.org/blogs

(4) 阅读代码
除了上面所说的ApiDemos的代码,还有SDK下提供的Samples目录下其他示例代码,还有Google公司提供的Demo代码,它们在:
http://code.google.com/p/apps-for-android/

———–
2010/6/11 补充内容:今天在网上找chrome代码阅读,看到Venus神庙的 Android学习入门http://www.cnblogs.com/duguguiyu/archive/2010/01/23/1654559.html
感觉不错,也推荐给大家,Venus神庙写作水平不错,比我好N倍。

Categories
Android

Android Market的 Loading效果

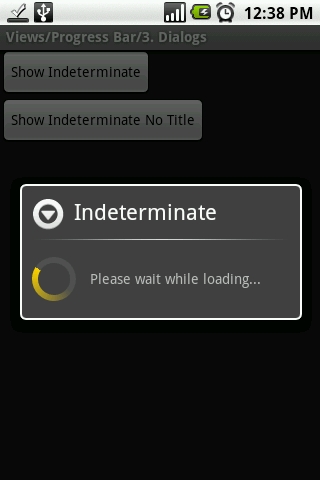
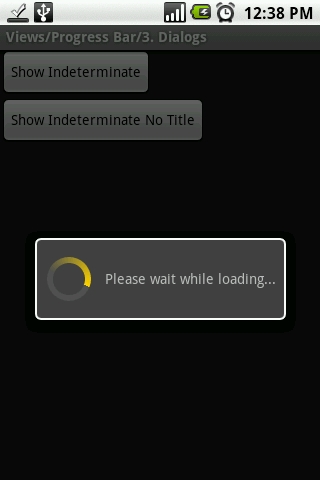
在Android中,要实现Loading效果,一般情况下都使用ProgressDialog控件。ApiDemos/src/com/example/android/apis/view/ProgressBar3.java 提供两个demo:
Progressbar show Indeterminate
progressbar show Indeterminate No Title
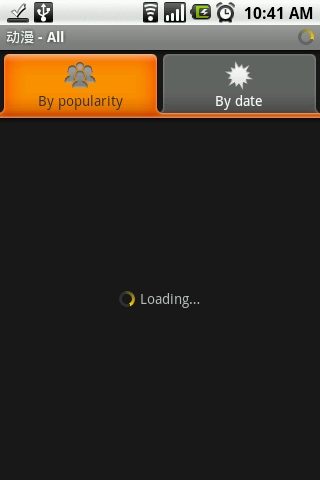
仔细看了Android Market,发现却是不一样的,请看截图:
那到底如何实现呢?首先,我们创建一个布局文件,
res/layout/fullscreen_loading_indicator.xml, 其内容如下:

<?xml version="1.0" encoding="utf-8"?>
<LinearLayout
    xmlns:android="http://schemas.android.com/apk/res/android"
    android:gravity="center_vertical|center_horizontal"
    android:orientation="horizontal"
    android:id="@+id/fullscreen_loading_indicator"
    android:visibility="gone"
    android:layout_width="fill_parent"
    android:layout_height="fill_parent"
    >
    <ProgressBar
        android:layout_gravity="center_vertical"
        android:layout_width="wrap_content"
        android:layout_height="wrap_content"
        style="?android:attr/progressBarStyleSmall"
        >
    </ProgressBar>
    <TextView
        android:id="@+id/current_action"
        android:layout_width="wrap_content"
        android:layout_height="wrap_content"
        android:layout_marginLeft="5.0dip"
        android:text="@string/loading"
        >
    </TextView>
</LinearLayout>
然后在main.xml 把它include 进来

<?xml version="1.0" encoding="utf-8"?>
<FrameLayout
    xmlns:android="http://schemas.android.com/apk/res/android"
    android:layout_width="fill_parent"
    android:layout_height="fill_parent"
    >
    <LinearLayout
        android:orientation="vertical"
        android:id="@+id/main_info"
        android:visibility="gone"
        android:layout_width="fill_parent"
        android:layout_height="fill_parent"
        >
    </LinearLayout>
    <include
        android:visibility="visible"
        android:layout_width="fill_parent"
        android:layout_height="fill_parent"
        layout="@layout/fullscreen_loading_indicator"
        >
    </include>
</FrameLayout>
主程序 Loading.java:
package org.lytsing.android.loading;

import android.app.Activity;
import android.os.Bundle;
import android.widget.LinearLayout;

public class Loading extends Activity {

    private LinearLayout mLoadingLayout;

    /** Called when the activity is first created. */
    @Override
    public void onCreate(Bundle savedInstanceState) {
        super.onCreate(savedInstanceState);
        setContentView(R.layout.main);

        // TODO: dismiss the loading, use this snippet code.
        //mLoadingLayout = (LinearLayout)findViewById(R.id.fullscreen_loading_indicator);
        //mLoadingLayout.setVisibility(View.GONE);
    }
}
运行的效果为:
代码下载: https://github.com/lytsing/MarketLoading
Categories
Android

Android 代码风格指南

翻译状态: 完成进度82%

本文的英文原始文档(Android Code Style Guidelines for Contributors)地址 : http://source.android.com/source/code-style.html

国内用户如果无法直接访问,请自行翻墙。第一次翻译Java类的文档, 如果有差错和不妥之处, 请不吝指出.

Android的代码风格规则

The rules below are not guidelines or recommendations, but strict rules. Android代码贡献者,如果他们不遵守这些规则,那么一般他们的代码不会被接受
并非所有现存的代码遵循这些规则,但所有的新代码希望能如此

Java 语言规则

我们遵循标准的Java编码约定。
我们还添加一些规则:
  1. 异常:不要在没有说明的情况下捕捉和忽略它们。
  2. Exceptions : 不要捕捉一般异常, except in library code at the root of the stack.
  3. Finalizers :一般不使用它们。
  4. Imports : 完全符合引入

Java库规则

这里有一些关于使用android Java库与工具的约定。在某些情况下,该约定在一些重要的方式已经发生了变化,老的代码可能在使用过时的模式或库。当使用这些代码,最好继续保持与已存在的风格一致(参见一致性)当创建新的组件从来不使用废弃库。

Java的风格规则

当所有文件都保持一致的风格时,程序就更容易维护。我们遵循标准的Java编码风格,他们由Sun公司为Java编程语言制定的编码约定,除少数例外,和增加一些。这些风格指南是全面而详细的,在Java社区很常用。

此外,我们执行下面的样式规则:
  1. 注释/Javadoc :使用标准样式写它
  2. 简短的方法 :不写超大的方法
  3. 字段(成员变量):要么是在该文件的顶部,或紧接在使用它们的方法前面。
  4. 局部变量 :限制作用域
  5. 引入 :android;第三方按字母顺序排列;java(x)
  6. 缩进排版 :4个空格,没有制表符(tab)
  7. 行长度 :100个字符
  8. 字段命名 : 非公有的,非静态字段以m开头,静态变量以s开头 。
  9. 括号 :开括号不要独占一行
  10. 注解 :使用标准的注解。
  11. Acronyms are words : Treat acronyms as words in names, yielding XmlHttpRequest , getUrl() , etc.
  12. TODO的风格 :“TODO:在这里写描述”
  13. 一致性 :看看你周围的
  14. 日志记录 :小心日志记录,它开销很大。

Javatests样式规则

1. 测试方法的命名 :testMethod_specificCase是正确的
Pages: Prev 1 2 3 ... 12 13 14 15 16 17 18 19 20 21 22 Next